HUD
| This article may need cleanup to meet quality standards.
Please help improve this if you can. The Discussion page may contain suggestions. |
Please help improve this if you can. The Discussion page may contain suggestions.
Reason: "Remove breaking the 4th wall/wikify writing"

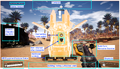
The HUD or Heads Up Display is a graphical interface overlaid onto the screen to give the pioneer information. It includes a cross-hair, compass, hotbar, a list of shortcuts, a health bar, and equipment status.
Compass

At the top is the compass, which shows the cardinal directions relative to the pioneer's current facing and also indicates the directions of any vehicles with an icon. It also shows the direction of waypoints from the HUB or Beacons. Which Beacons are displayed, and at what distance it will show on the compass, can be controlled from the Map's Beacons menu once unlocked at Tier 1.
- Take note the cardinal directions are not exactly aligned to the center of each alphabet: E, W, N, and S, instead they are aligned slightly to the left.
Hotbar

At the bottom is the hotbar, which is a list of numbered slots, similar to hotbars found in many other games. Placeable entities such as vehicles and buildings can be placed in the slots, allowing them to be selected and placed. For example, if you wish to build conveyor belts without having to enter the build interface every time, you can place them in the hotbar by entering the build menu and hovering over the image of the conveyor belt with the mouse. Then you press a number (1-0) on your keyboard and the conveyor belt will be placed in the corresponding slot on your hotbar.
The hotbar currently serves for building or customizer shortcuts only, it does not interact with the player's inventory.
There are 10 hotbars. Scroll through them with Alt+![]() scroll.
scroll.
Shortcuts

At the bottom right lists the shortcut keys of several tools.
- Q - Build menu
- X - Customizer menu
- F - Dismantle mode
- B - Flashlight
- V - Resource Scanner or Self-Driving menu (latter in vehicles)
- O - Codex
- H - Hide Equipment | Hide the Currently Building/Dismantling + Building Requirements UI when using Build Gun or Dismantle mode
- Tab ↹ - Inventory
- M - Open Map (once unlocked at Tier 1, otherwise appears as a blank spot)
Health and equipment status

At the bottom left is the Pioneer's health and equipment status. The health bar indicates how many health points the pioneer has, one segment corresponds to 10 health points, with full health at 100 HP (10 segments).
If any equipment is equipped, a corresponding status bar showing the status of the equipment will appear above the pioneer's health bar:
- If fuel is required to operate the tool, the fuel available in inventory will be displayed.
- If there is no fuel available, there will be a warning icon indicating that the tool will not work.
- The Chainsaw stores fuel internally. Body equipment using fuel (Jetpack, Gas Mask, Hazmat Suit) show a bar with how much is left before another fuel unit will be consumed, or before the equipment will stop operating.
- If the equipment is stackable, the amount of it in the stack is displayed (consumables, Parachute)
- If driving a wheeled vehicle, the HP of the vehicle will also be shown. If the vehicle HP is depleted, it will disappear.
- Vehicle can be damaged by Spitter's or Alpha Spitter's fireball attack.
- Trains are invincible, they don't have HP.
Map
- See Map
Photo mode
Pressing P will bring up the photo mode, which can be used to take screenshots. The HUD does not appear in screenshots taken in Photo Mode, but equipment does which can be unequipped or holstered H. However, hiding Hoverpack controls is not possible while airborne.
Clicking the left mouse button ![]() takes a screenshot. The right mouse button
takes a screenshot. The right mouse button ![]() can be used to toggle hi-resolution mode, which quadruples the screenshot size. Note that it does not cause far-away models to load in. Clicking the scroll wheel
can be used to toggle hi-resolution mode, which quadruples the screenshot size. Note that it does not cause far-away models to load in. Clicking the scroll wheel ![]() hides the photo mode UI, which itself never appears in the final screenshot.
hides the photo mode UI, which itself never appears in the final screenshot.
Scrolling ![]() zooms in/out by changing the FOV.
zooms in/out by changing the FOV.
Binoculars
Photo Mode can be used as binoculars by zooming in with scroll wheel ![]() which can help during exploration and aids in determining what distant objects are.
which can help during exploration and aids in determining what distant objects are.
Screenshot save location
Screenshots are stored in the following location:
- Windows:
Documents\My Games\FactoryGame\ScreenshotsorUsers\%Username%\AppData\Local\FactoryGame\Saved\Screenshots\WindowsNoEditor - Linux:
~/.var/app/com.valvesoftware.steam/.local/share/steam/steamapps/compatdata/526870/pfx/drive_c/users/steamuser/Documents/My Games/FactoryGame/Screenshots - Linux (installation on another drive than your home dir):
{YOUR DRIVE}/SteamLibrary/steamapps/compatdata/526870/pfx/drive_c/users/steamuser/Documents/My Games/FactoryGame/Screenshots
Game version
- At the top left is the game version.
- For a multiplayer session, all clients must own the same version of the game as the host to be able to join the game.
- Always refer to the game version when reporting a bug.
Milestone requirement
- At the top right is the current HUB Milestone requirement.
- If a milestone is recently completed, the timer will indicate when the FICSIT Freighter will land back to the HUB.
- If a Space Elevator phase is built, its current phase and required material will also be shown here.
To Do List
- At the middle right is the To Do List.
- Items or Building blueprints can be added to the to-do List using Codex, Craft Bench or Build menu.
Current objective
- At the middle left is a list of current objective.
- This panel is only active from the Beginning until HUB upgrade 6, which also serves as a start-up Tutorial.
Gallery
The HUD as the pioneer exits the Drop-pod.

History
- Patch 0.8.2.0
- Hotbar system has been reworked
- Added a way to save the current hologram into the hotbar by pressing Alt+Shortcut key combination
- You can now swap the Hotbar scroll direction in the “Controls” menu in the Options menu (Clockwise and Counterclockwise)
- Patch 0.7.0.8: Added support for hiding some HUD elements. Can be toggled on and off in the options menu
- Patch 0.7.0.0 Undocumented Change: Gave additional function to H. During Build Mode Q and Dismantle Mode F using Key H will "Hide on the HUD" the Currently Building/Dismantling + Building Requirements UI.
- Patch 0.6.1.2: Repositioned Experimental Banner to obstruct less of the regular HUD elements
- Patch 0.6.1.1:
- Fixed holstering the Boom Box making the equipment HUD slot show incorrect info
- Fixed Ammo Counter and Icon not changing when reloading or switching ammo types
- Patch 0.6.0.15
- Updated Compass visibility
- Fixed Equipment icon in HUD flickering when equipping an item for Multiplayer Clients and Dedicated Server Clients.
- Patch 0.6.0.12: Fixed issue where consumables wouldn’t show their total amount when holstered
- Patch 0.6.0.5
- Fixed an issue where the active equipment indicator in the Equipment HUD Slot wouldn’t work in some cases
- Fixed Current Weapon UI and Keybind Shortcuts UI overlapping when switching tools
- Patch 0.6.0.4
- Fixed Medical Inhaler not working properly with the HUD Equipment slots
- Fixed various issues related to compass showing wrong values/positions
- Fixed radiation/damage indicator being blocked by compass icons
- Fixed Player Health bar background scaling with amount of equipment
- Updated Vehicle health bar to follow the new style of the Player health bar
- Fixed issue where the Equipment HUD Slot for Consumables wouldn’t update properly on Multiplayer Clients or Dedicated Server Clients
- Patch 0.6.0.3
- Equipment HUD is now correctly updated for Multiplayer Clients or Dedicated Server Clients
- Weapon crosshairs are now correctly updated for Multiplayer Clients or Dedicated Server Clients
- Patch 0.6.0.2
- Fixed the highlighted map markers not being shown on the compass
- Fixed Markers and Stamps not being highlighted on the compass
- Patch 0.6.0.0
- Added holster functionality for the currently equipped Hand Slot. Default keybinding is H
- Overhauled equipment HUD to fit all those additional equipment
- Added HUD feedback for scrolling through Hand Slots
- Added optional HUD indicators for aggressive wildlife (can be turned on in the options menu)
- Updated all weapon crosshairs
- Resource Node icons on the compass now distinguish between occupied and unoccupied nodes
- Updated the Health Bar visuals
- Patch 0.5.1.11
- A HUD message is now displayed every time an automated vehicle gets completely stuck (“deadlock”)
- Fixed Trains and Train Stations not showing the correct location on the Map and Compass
- Patch 0.5.0.10: Fixed “Current Objective” display in HUD showing the wrong requirements for some objectives
- Patch 0.5.0.6
- Fixed Milestone Progression UI not being visible anymore
- Added indicator for the HUD in Build Mode to display how many objects are being built when zooping
- Patch 0.5.0.0: Shortcuts in the bottom right of the HUD have been updated to show all common actions
- Some default shortcuts have been changed:
- Default Flashlight keybinding is now B
- Default Map keybinding is now M
- Default Codex keybinding is now O
- Customizer was assigned to X
- Some default shortcuts have been changed:
- Patch Closed Alpha 4: Photo mode introduced
- Patch 2018-10-17: Introduced
| ||||||||||||||||||||||||||||||||