Tutorial:Train throughput
The actual in-game throughput of a Freight Platform can be calculated if one wishes to be that precise. The most important variable in this determination is how long it takes a train to do a complete round trip, called Round-trip Duration (RtD). This is measured between the first and last departure "choo" at any single station on the route.
After measuring the Round-trip Duration using a stopwatch, the next thing you need to find is your Time to Fill (TtF). This governs which equation is used to solve for throughput.
Time to Fill
Time to Fill is not in reference to how long it takes to fill a Freight Platform. It deals with how much time is required to fill the capacity of a Freight Car.
Freight Car Capacity is 32 stacks for item cars, and 1600 m³ for fluid cars. Fluid isn't variable, as 1600 m³ is the same regardless of fluid type. Item freight's TtF however, will change based on the Stack Size of the items being moved.
It is vital to remember that during each loading and unloading animation, the freight/fluid platform blocks all in-and outputs for 28.07 seconds[1] (0.4513 min). Bringing the lockout timer variable into the equation gives you the following:

As previously stated, the 0.4513 is converting 28.07s to minutes. Belt Speed is the combination of belts leading into the platform. At most this number will be 1560 (when using ×2 Mk5 belts). Any combination of belt marks is possible, simply add the two numbers together for the maximum theoretical throughput. For actual maximum throughput, Belt Speed is equal to the exact items per minute being sent to the platform.
Examples
The TtF of an item with a Stack Size of 500, such as ![]() Quickwire, using 2×
Quickwire, using 2× ![]() Conveyor Belt Mk.5:
Conveyor Belt Mk.5:

Whereas an item with a Stack Size of 50, such as ![]() Computers takes:
Computers takes:

About one seventh the amount of time compared to Quickwire.
Doing ![]() Quickwire again, but with 2×
Quickwire again, but with 2× ![]() Conveyor Belt Mk.3 gives you:
Conveyor Belt Mk.3 gives you:

Calculating throughput

In both formulas, the maximum theoretical throughput will have Belt Speed = 1560. For the actual maximum throughput, Belt Speed is your actual item input rate.
- TtF ≥ RtD
If the Time to Fill is longer than (or equal to) the Round-trip Duration, the train car will be semi-loaded in most cases. The throughput formula used in this context is:

Note: You can solve for the actual, in-game throughput using this formula if you take precise timing measurements.
However, for ease of use, it is recommended to roughly time the route and solve for the maximum theoretical throughput. Once you know the maximum in theory, you can just compare that to how much you were planning to move. If you're under max theoretical throughput, you're good.
- TtF < RtD
If the Time to Fill is shorter than the Round-trip Dime, the train car will be fully loaded on every pickup. You do, however, lose throughput in this scenario due to wasted potential while waiting for the train to arrive. Throughput formula:

The only way to reach maximum theoretical throughput per car is if your Round-trip Duration is exactly equal to your Time to Fill. This is nearly impossible to do in a vacuum, and becomes even less likely in train systems with multiple trains, junctions, or even simply if the Stack Size of the items being loaded isn't a uniform number.
Keep in mind, all of this is solving the throughput of a single Freight/Fluid Platform. If you wish to solve the throughput potential of an entire train, it is more complicated. As you must do the above for each individual platform of the train, and that's assuming the train commutes only between 2 stations. In systems where one or more trains are making multiple stops, it is better to solve throughput for the drop-off platforms themselves, rather than try to equate how much an individual train is moving.
Solved maximum throughput
After solving the above, the maximum throughput numbers based on Stack Size are as follows:
| Freight | Stack Size | RtD | Throughput |
|---|---|---|---|
| Items | 50 | 88.62s | 1083.3/min |
| 100 | 150.16s | 1278.66/min | |
| 200 | 273.23s | 1405.4/min | |
| 500 | 642.46s | 1494.25/min | |
| Fluid | 107.08 | 896.52 m³/min | |
If your Round-trip Duration is shorter or longer than the above listed value, your attainable throughput will be lower than the maximum theoretical throughput.
Note about Fluid Cars
Freight Cars with Packaged Fluid are equal to the 100 per stack values, but if you're recycling the Empty Cans back, you need twice the amount of Freight Cars. This means in either case, you're using 2 Freight Cars to move 3200 units of fluid. (The only way to get around this would be sending the Empty Cans back via a different train, truck, or drone; or not recycling them at all by simply making them at pick-up and destroying them at drop-off).
This changes the comparison of Fluid Cars vs. Freight Cars to:
| Freight | Stack Size | RtD | Throughput |
|---|---|---|---|
| Canisters | 100 | 150.16s | 1278.66/min |
| Fluid | 107.08 | 1793.04 m³/min | |
Meaning that, when used properly, Fluid Cars are better in terms of throughput for moving your liquids. ![]() Nitrogen Gas should always be packaged before shipping as it has a 4x compression ratio (meaning a Freight Car can move 5114.64 items/min).
Nitrogen Gas should always be packaged before shipping as it has a 4x compression ratio (meaning a Freight Car can move 5114.64 items/min).
Use of external buffers
Train logistics is the sole context in Satisfactory where "buffering" is needed.[2] Industrial Storage Containers perfectly match the dual input/output of Freight Platforms, and can even be wrapped next to them to save space. Fluid Platforms require a more complicated configuration.
Gallery
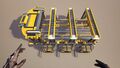
Storage Containers being "wrapped" to save space.
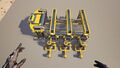
Fluid Buffer configuration, handles 600 m3/min per platform.
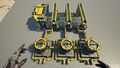
Industrial Fluid Buffers are needed for maximum potential.


References
| ||||||||||||||||||||||||||||||||