Tutorial:Hypertube cannon
A Hypertube cannon is a specific setup of Hypertube Entrances and short Hypertube segments, which can be used to reach very fast speeds, capable of crossing the entire playable world in seconds. Hypertube Cannons abuse a bug in Unreal Engine's physics system, allowing the user to gain momentum at an exponential rate. This gain in momentum is directly dependent on the FPS of the player using the cannon. The higher the FPS of the player, the less speed the player will gain. As such, during the construction and testing, it is recommended that the player use the FPS limit feature in the graphics settings to get consistent results.

Construction
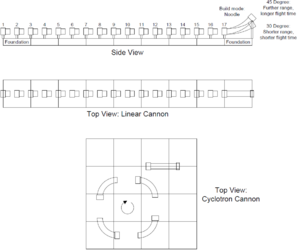
- Build a row of 9 foundation tiles in the direction you want to launch.
- Every 4 meters, place a Hypertube Support, not placing more than 17. Chaining over 17 entrances is not recommended, as the velocity gained in the Tube will shoot the player beyond the map boundary. (This does not matter for an enclosed Hypertube chain.)
- Place a Hypertube Entrance at the front of each segment. Note: the Hypertube Entrance can only face one direction if placed after the Hypertube.
- Place a Hypertube Support between each supported Hypertube Entrance. There should now be 2-meter gaps between each object.
- Place a Hypertube from the first Hypertube Entrance, reach 2 meters to the first empty Hypertube Support. Repeat for every Hypertube Entrance.
- As shown at the top of Figure 3, remove the non-entrance Hypertube Supports.
- The last segment determines the launch angle of the player and will significantly affect the distance travelled. (If making an enclosed cannon, just continue building a normal Hypertube chain from here.) The angle is determined by the placement of the end support, not the angle of the Hypertube. The end segment Hypertube Support should be 6-8 meters from the exit of the last launch tube. 30-degree and 45-degree (farthest) upwards curves are the most common launch angles.
- Power all the entrances.
A Hypertube Cannon won't work when built vertically. To fly vertically, make a normal cannon and make the last segment's Hypertube Support point directly up.
Hypertube cyclotron
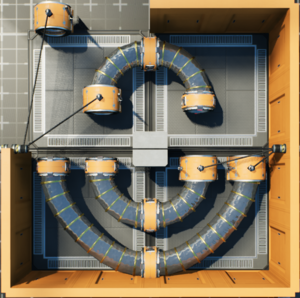
A variant to the Hypertube cannon is the Hypertube cyclotron, where several short segments are chained to form a loose loop, with the launching Tube placed at some distance away. When the speed gained in the loop is fast enough, it throws the pioneer out of the loop and into the launching Tube for the actual launch.
As this usually uses fewer entrances than the straight version, it can save some power but is much more difficult to use, as it can be unreliable in picking which direction you will fly. The cyclotron can be made reliable using an auxiliary tube to redirect the player.
Fully enclosed cannon
Another variant is, instead of a short upward curved tube at the last segment, the last tube is connected all the way to the destination. In this case, a Jetpack is not required for safe travel. The enclosed nature of this method allows for even higher speeds (more than 17 entrances) as being shot out of the map doesn't have to be worried about.
The construction cost will be much higher and more tedious to build. There will be no usage flexibility to this design: the destination cannot be changed freely, as there is no mid-air travel.
When using this variant, it is recommended to use a Hypertube brake at the exit. This is to prevent a breakdown in physics when traveling at high speeds. See Tutorial:Hypertube brake
Transiently powered cannon
As we only need to power the cannon when we want to use it, we can instead use a switch between the cannon entrances and the supply power and place a power storage on the same grid as the entrances. With the switch off most of the time, it doesn't continuously drain power and then when you want to use it, flip the switch, wait 5-10 seconds for the storage to charge up enough (good time to equip the Jetpack) and flip the switch off again. You should have a few seconds to get into the cannon before the storage runs out.
The advantage of this is that we only ever have the power draw of a single cannon and the energy storage to worry about. So we can build as many cannons as we like without having to worry about the cumulative load on the power grid.
Usage
- Save your game. Furthermore, if the auto-save countdown is appearing on the screen, do not enter the Hypertube, wait for the auto-save to complete first.
- Equip a Jetpack and enter the 1st entrance for crossing the longest distance. As the flight range is affected by the speed of the pioneer entering the Hypertube, the flight range can be boosted by entering the Tube with a Blade Runner while running on an Mk.5 Belt.
- Using a Jetpack is the easiest, but if you do not have one, a Parachute can be used instead.
- If overshot, reload the saved game and enter from the 2nd entrance for a shorter distance. If still overshot, enter from the 3rd entrance, etc.
- Generally, 17 entrances are only needed to cross the diagonal of the map. For a distance such as 2 km, 15 entrances should be enough.
- Build walls or U-Jelly Landing Pad at the other end to land safely without a Jetpack.
- To build the U-Jelly on the correct landing point, you may need to save first then purposely die on the landing point, then observe the position of the Death Crate to identify the exact location.
- Experiment with the ideal launching angle by adjusting the tilt and curvature of the last tube segment.
- During mid-air, use ↑↓←→ to adjust your flight path.
- Performing sharp turns during mid-air will impact the flight range.
- The pioneer takes no damage from slamming into a wall or a vertical rock, or scratching a ground horizontally; damage is only received from falling vertically. If lands on the ground at diagonal velocity, then only the vertical component of the velocity is counted towards the fall damage.
Fast map exploration
- Build The HUB near the cannon to set your spawning point near it.
- Store all your inventory at a safe place, do not bring anything along.
- Launch across the map at any chosen angle.
- Kill yourself by simply letting the cannon launch you outside the map, or click respawn button in the Esc menu.
- After respawn, adjust the last tube to a slightly different angle, then repeat the launch. Eventually, the entire map will be revealed.
- While flying, you can open the Map M and adjust the flight path for maximum reveal coverage.
Distance equation
For a Hypertube cannon with a launch angle of 45°, the flight distance will be:
assuming the Pioneer enters the cannon with close to zero initial velocity.
Alternatively for varying launch angles:
where α is the launch angle and v is the launch velocity:
If the player correctly times a slide-jump into the first Hypertube Entrance while equipped with Blade Runners, launch velocity and travel height/distance will be vastly increased.
| ||||||||||||||||||||||||||||||||


 [
[ [
[ [
[